Horizon
Welcome to open source Argos / Kineis development
1. Preparing for deployment
Important – Horizon boards now come pre-installed with the latest Linkit firmware and new users should follow the Linkit user and programming guide available on Github (January 2025 or later). If you still want to use the legacy Horizon firmware, continue reading.
Legacy Horizon Deployment Setup
Once you have installed the Horizon Python tools and have confirmed that you can communicate with the tag you’re ready to prepare for a deployment.
There are 3 key steps to prepare your tag:
1) Edit and check your GPS settings in the configuration file.
2) Decide if you want to load a uBlox AssistNow supplementary file for faster GPS lock times.
3) Copy fresh “prepass” orbital correction details into your configuration file.
4) Edit and configure your satellite settings in the configuration file.
2. Editing your GPS configuration
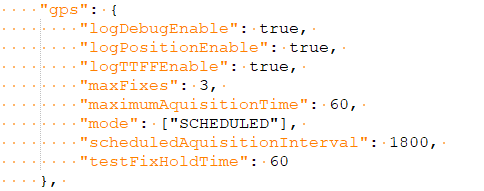
The default configuration file loaded on your tag at factory is configured with the following GPS parameters (below).
You can download a copy of the configuration file already loaded on the tag by connecting the tag and running:
Edit the JSON file received and you will find the configuration parameters inside. Let’s start with editing the GPS parameters:
A full command list with descriptions can be found here.
The settings above translate to:
- Save debug information in the log
- Save GPS positions in the log
- Save Time to First Fix in the log
- Only aquire 3 fixes per wakeup event
- Spend a max of 60 seconds trying to aquire fixes per event
- Run in a scheduled mode, waking up periodically
- Wake up every 1800 seconds
- On first powerup, spend 60 seconds getting the first initial fix before continuing
3. Loading in a uBlox AssistNow GPS file
The Horizon tag supports the use of uBlox AssistNow files to speed up time to first fixes. AssistNow accelerates calculation of position by providing a local copy of satellite data such as ephemeris, almanac, accurate time, and satellite status to the GNSS receiver. This enables the onboard u-blox GNSS receiver to compute a position within seconds, even under poor signal conditions.
An AssistNow file has a lifetime of ~30 days, so won’t provide total coverage for long deployments, but for shorter deployments it can speed up time to first fixes considerably when the tag doesn’t have sufficient time to achieve a lock under normal circumstances (i.e for sea turtle monitoring when the turtle only exposes the tag for a few seconds). For longer deployments Argos doppler can be used to compute position (i.e several years at sea).
To load an AssistNow file, first register for a free account using the u-Blox ThingStream service by registering for an account and then generating an AssistNow Offline token via the uBlox website here.
Upon registration to the service, a token shall be issued that permits access to the uBlox HTTP server. Typing the following URL format into a webbrowser should obtain a new file. Note – it takes about 15 mins in our experience for the token to become active once created.
N.B replace YOURTOKENHERE with your own token ID and download the mgaoffline.ubx file.
http://offline-live1.services.u-blox.com/GetOfflineData.ashx?token=YOURTOKENHERE&gnss=gps,glo&period=4
Once you have aquired the mgaoffline.ubx file, upload the contents into your Horizon tag by running the following command:
4. “Prepass” orbital correction parameters
For the tag to transmit when a satellite is overhead we need to load in “prepass” orbital correction parameters. Details of each Argos satellite’s trajectory can be downloaded from the Argos Web dashboard and parsed into parameter data that is then loaded into the Horizon tag’s configuration file to achieve this. Both GPS and Argos satellites require slight orbital corrections over time for a ground transmitter to know where they may be at any given point. This is why correctional parameters are required and should be updated every 6 months if possible.
When a satellite passes overhead, the tag can then be configured to transmit at a certain elevation to ensure that there is a good chance of the transmission being received. You can also “burst” through a pass, transmitting multiple times throughout a pass window.
To aquire orbital correction data from the Argos Web dashboard you will first need to register with CLS to open an Argos account. Using your username and password, log in to the Argos Web dashboard at argos-system.cls.fr
Next, click System > Satellite pass prediction
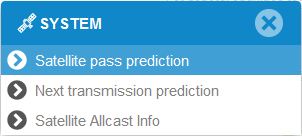
Complete the pass prediction form by ticking all of the satellites and then selecting “Download satellite AOP“.
A text file will be downloaded. We now need to parse this text file to convert it into the parameters that we will enter into the Horizon tag’s configuration file.
To parse the file, copy the downloaded AOP file into your Horizon Tools /tests directory and run the following command: sudo python3 artic_bulletin_to_json –file name_of_your_AOP_file.txt

You will be presented with an output similar to:
{“bulletin”: [{“secondsSinceEpoch”: 1566170997, “params”: [7195.621, 98.569, 322.886, -25.341,101.3601, 0.0], “satelliteCode”: “MA”}, {“secondsSinceEpoch”: 1566169463, “params”: [7195.651,98.6984, 336.302, -25.34, 101.3604, 0.0], “satelliteCode”: “MB”}, {“secondsSinceEpoch”: 1566167445,“params”: [7195.586, 98.7004, 345.036, -25.34, 101.3591, 0.0], “satelliteCode”: “MC”},{“secondsSinceEpoch”: 1566170008, “params”: [7226.502, 99.181, 268.188, -25.5, 102.0106, -1.98],“satelliteCode”: “19”}, {“secondsSinceEpoch”: 1566167176, “params”: [7160.249, 98.5406, 112.607,-25.154, 100.6149, 0.0], “satelliteCode”: “SR”}]}
Copy the bulletin into your configuration file:
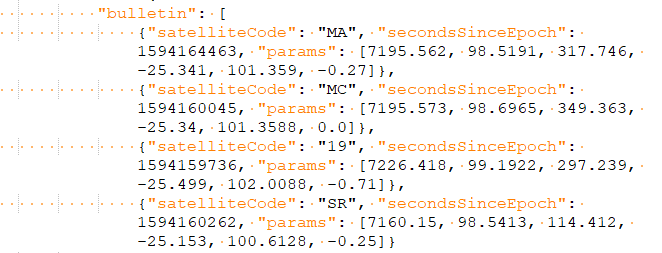
Lastly, make sure that you have entered your Argos ID and enter the minimum elevation of the satellites that you’d like to target.

To see a table of satellites and their elevations, visit the Satellite pass prediction page again but this time enter the Lat and Long of your location and your altitude. Then click Simulate and you will see a table of results that looks like the following:
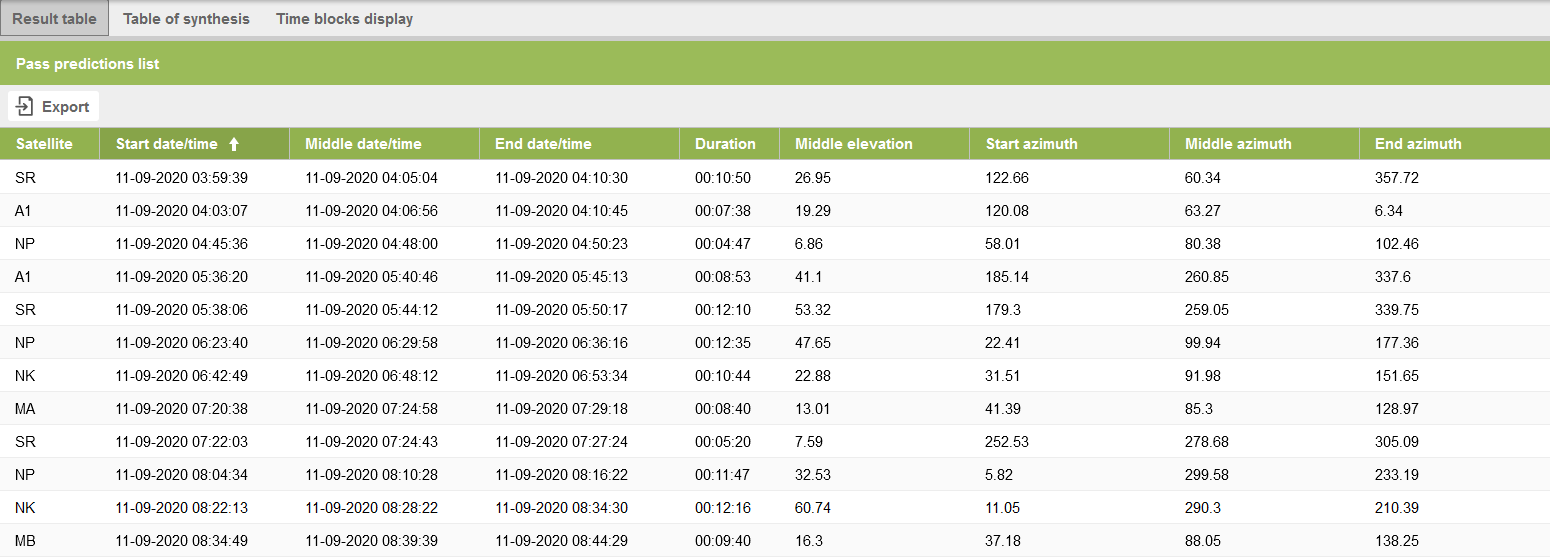
You can see from the table above that if you were to set a minimum elevation of 40 degrees, 4 of the satellites listed will be targeted as the middle elevation is used.
5. Editing your satellite configuration
The default satellite configuration file loaded on your tag from the factory is configured with the following satellite parameters:
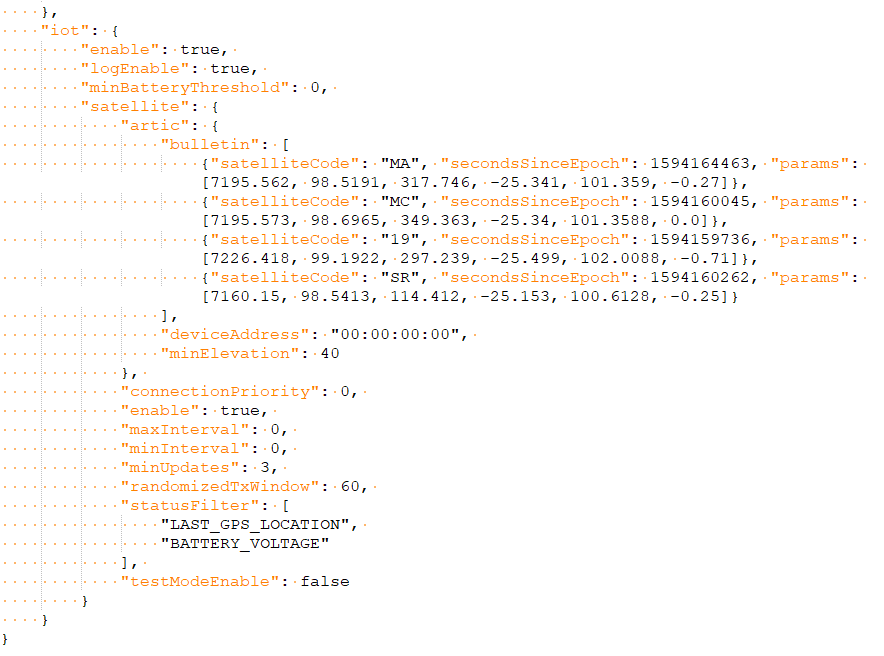
A full command list with descriptions can be found here.
The settings above translate to:
- Enable the use of IoT radios (the boards supports satellite and cellular)
- Enable saving status information to the log
- Don’t set a minimum battery level before transmitting
- Include the latest prepass orbital correction bulletin
- Specify your Argos ID
- State the minimum elevation of a satellite before transmitting
- Connection priority (0 = highest). This is used incase you want to use both cell and satellite together
- Enable the use of Satellite
- MaxInterval means to transmit if this threshold is met, even if another radio module has already transmitted.
0 disables. - MinInterval means don’t try to send a message if any other radio module connected has transmitted within the interval (seconds). 0 disables.
- MinUpdates means the minimum number of GPS fixes received before transmitting.
- randomTxWindow means to randomly transmit within the seconds specified during a pass. This feature is used when you have multiple trackers at the same location and would like to prevent them all transmitting at the exact same time.
- The status information to transmit in the Argos message.
- Test mode. To carry out a test view our testing guide.
6. Upload your configuration file to the tag
Now that we have prepared our tag we should save the JSON configuration file and upload it to the device.
Note – you’ll notice that “iot“, “enable” is set to “false“ by default, so confirm that you have updated this to true even if you didn’t make any other changes to the configuration file.
Once saved, let’s upload it to the tag by running the following command. Change “default.json” to the name of your own configuration file and push it to the Horizon tag like so:

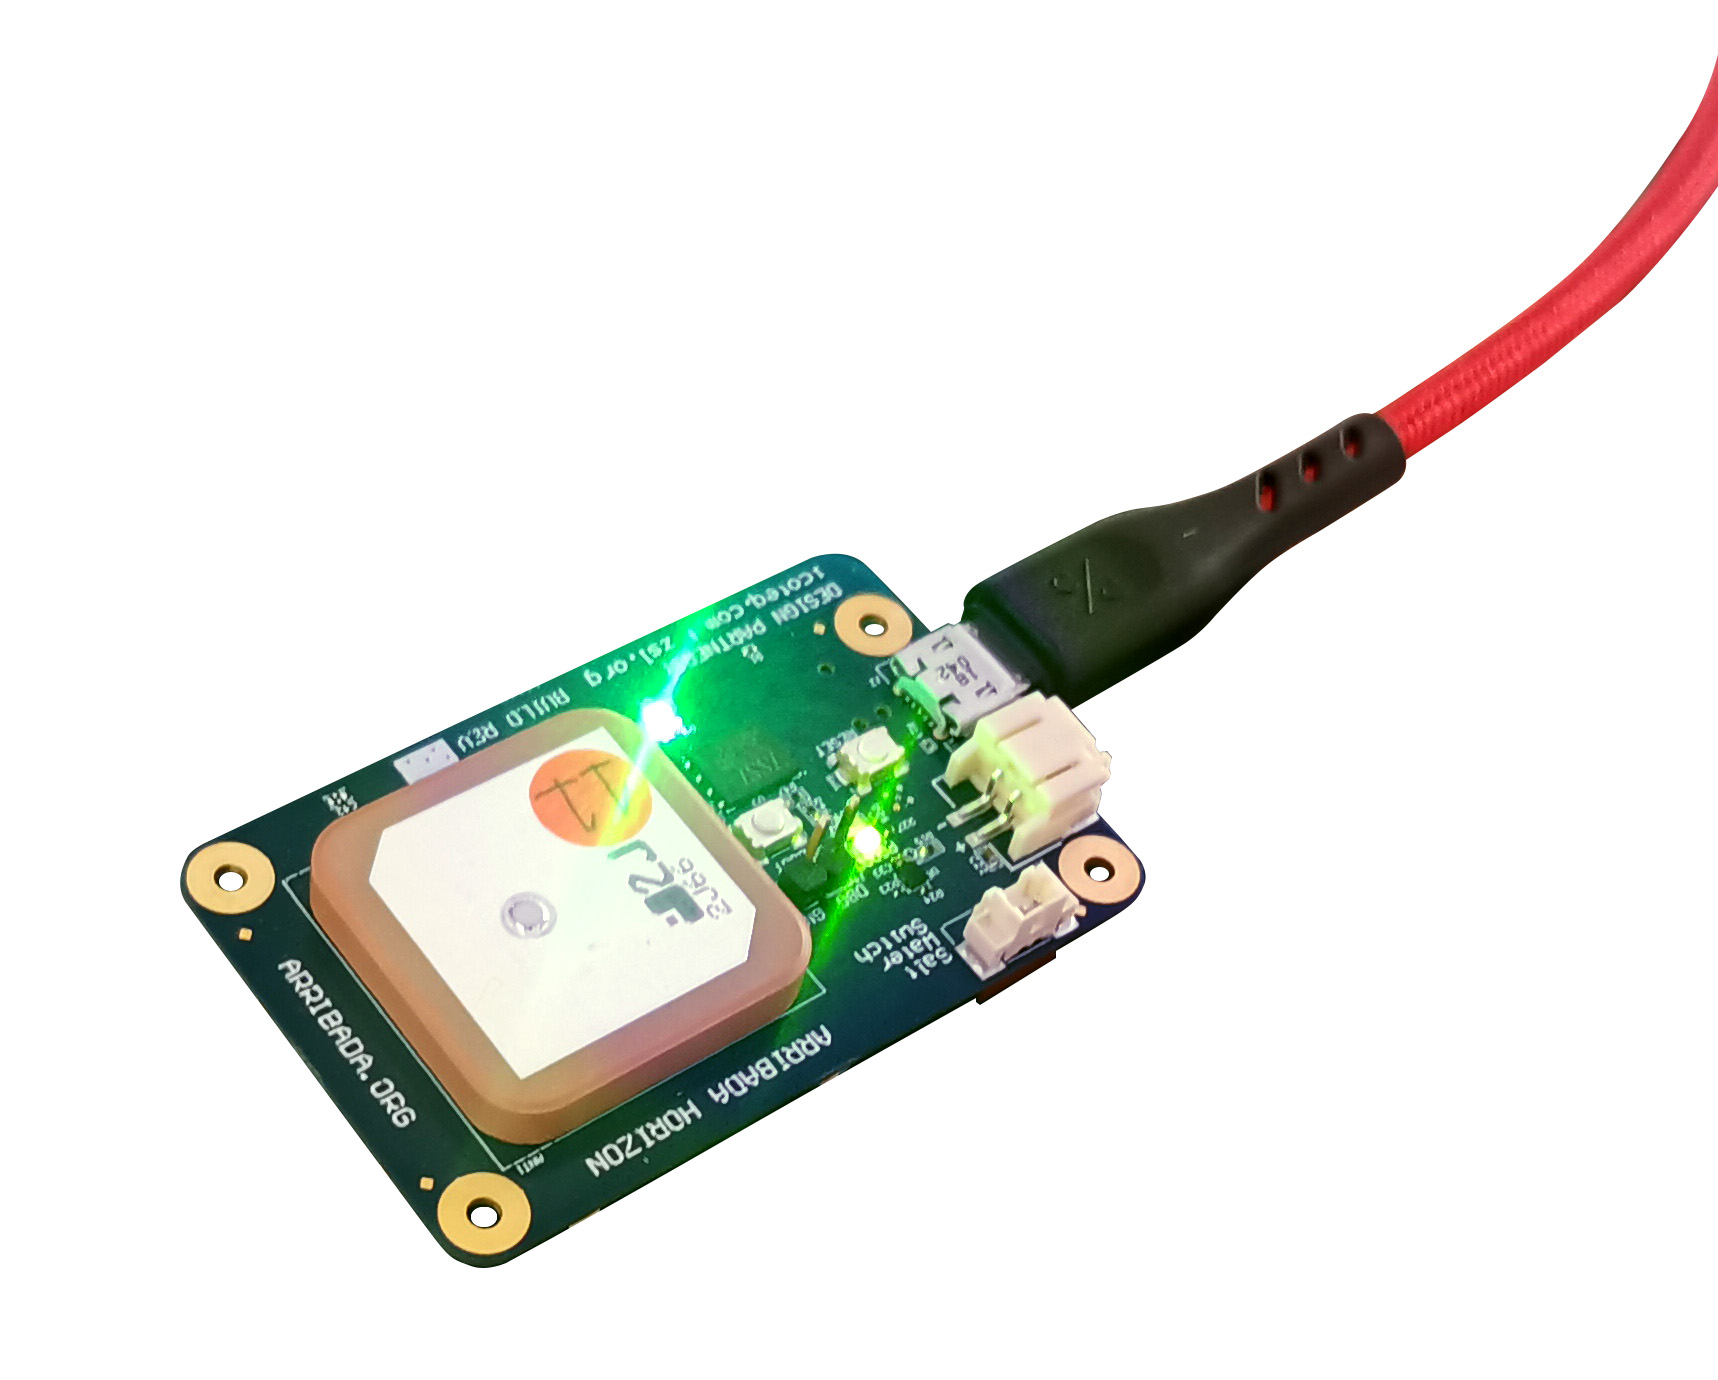
After erasing and creating a new linear log, the green LED should be lit up and on, indicating that the tag is happy with the configuration file you have uploaded. If the LED is red, there is an error in the configuration file, or the tag configuration hasn’t been completed.

If you are ready to deploy, disconnect the USB cable and the green LED will flash for a few seconds indicating that it is entering operational phase.
Deploy your tag, ensuring that the Argos antenna has a clear line of site to the sky.
If you want to check the status of your tag after a few hours or so, simply connect the tag over USB again and download the log file. A reminder about how to do that can be found here.
7. Decoding Satellite Data
It is now possible to decode data directly in the ArgosWeb dashboard by updating your board to the latest firmware. Contact us to beta test the latest firmware release if you’d like to try this.
However, you can still download and decode data manually using the current Horizon tools (RC 10).
To do this, log in to your ArgosWeb account and select Data > View your data.
Select the time frame you’d like to see and click Search.
Next, to export the data file click Export and select to download the CSV version of the data file.
To decode the data, copy the file to your Horizon tools /tests folder and use the argos_parse file like so:

We’re all in this together